The other day when I went out eating with my friend Francisco, he commented me about a personal project and what he wanted to accomplish. Listening to his questions the first tool that came to my mind that would solve some of the challenges he has was OpenSSH.
What is SSH?
SSH is a short for Secure Shell, it’s a protocol to manage services inside a network using a secure channel. One of the most common tasks that can be done using this protocol is to log into a server and remotely execute commands in this server.
SSH is the protocol and we need a tool that implements this protocol. The most used tool for this protocol is OpenSSH and the one we’ll be using for this guide. OpenSSH and other implementations come by default in Unix-like systems and in the case of Windows I personally use Git Bash because it’s Unix-like terminal in Windows. Others prefer using PuTTU.
Let’s do it
Although I could test everything in this guide using a virtual machine or a Linux PC in our local network, I preffer doing it in a more real environment to prove my point. I will create a public server.
Creating a public server
Important I will use DigitalOcean for this post, of course you can use other cloud providers e.g. AWS, Vultr, Linode, etc. The idea is to have a server that can be accessed from the Internet.
Something I like about DigitalOcean is that it charges you for the hours used i.e. a machine that is running for a complete month will cost 5 USD (the cheapest) but if we only have it running for an hour it will cost 0.007 cents. You can the check its pricing page.
Creating a server in DigitalOcean is very simple, just a couple of clicks, choosing the Linux distribution and resources to assign to the machine. I will choose Debian9 x64 with 1GB of memory that will cost 0.007 USD per hour.
I recommend you to assign an SSH Key when creating the server.
This link shows how to create a server.
Starting session via SSH
By default DigitalOcean allows yout to access the servers with a root user, which is considered a bad practice in terms of security. For a real server I recommend you to disable root login.
To log into a server run:
$ ssh usuario@servidor
For the case of DigitalOcean run:
$ ssh root@ip_droplet
Once connected we can do different things: run commands, configure the server, install/uninstall packages, etc. Now with this we can start to play and see some funny things we can do with SSH.
Local Port Forwarding
I will explain the concept with an example: let’s suppose we have a public server and behind it there is a private network that can have different private servers such as a database server. So as these servers are in a private network there is not a simple way to access these services. Some options to access these private services is to use a VPM or Local Port Forwarding. Local Porta Forwarding allows us to create a tunnel between a private service with our local machine via a public server that can access these private services.
Let’s check the next scenario:
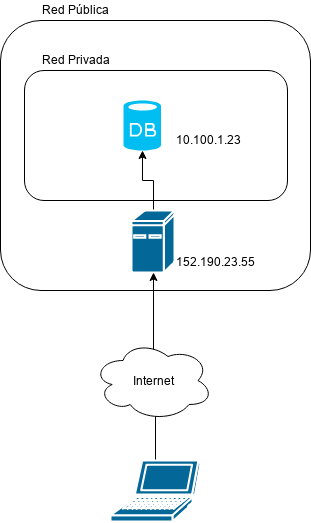
In the picture there is a MySQL database server in a private network with address 10.100.1.23 and its port is 3306 and there is a public server with IP address 152.190.23.56.
In case we want to access the private database server we need to be in the private network (something that is not true) because we are in our house’s local network. Fortunately the public server 152.190.23.56 has access to the private network and it also can be accessed from the Internet.
What we will do is to use this SSH’s feature called Local Port Forwarding to create a secure channel through the public server 152.190.23.56 between the port 3306 in my local computer and the port 3306 in the private database server 10.100.1.23.
The execution format is as follows:
ssh -nNT -L portA:private_host:portB user@server
Where:
-navoids STDIN input i.e. avoids setting up a terminal session-Ndo not execute a remote command-Tdisable the option to display a remote terminal-LLocal Port Forwarding optionportAport in our local machine where the remote service will be exposed e.g. MySQLprivate_hostthe private ip address of a server that can be accessed via a public serverportBremote service’s port that is running inprivate_host
For our example it would be something like:
ssh -nNT -L 3306:10.100.1.23:3306 root@ip_droplet
It is important to note that in case we have MySQL installed in our local machine it would be a port conflict. In that case we can use something like.
ssh -nNT -L 3307:10.100.1.23:3306 root@ip_droplet
Let’s suppose the case that users in our local network need to access this private service as well, the simplest solution would be these users to follow the same procedure but let’s add the constraint that they don’t have permissions to access the public server. In this case the solution would be that I do the same procedure but I expose my local port inside the local network so any user can connecto to my local ip address which in turn will connect to the remote private database server.
Next diagram shows what we want to accomplish:
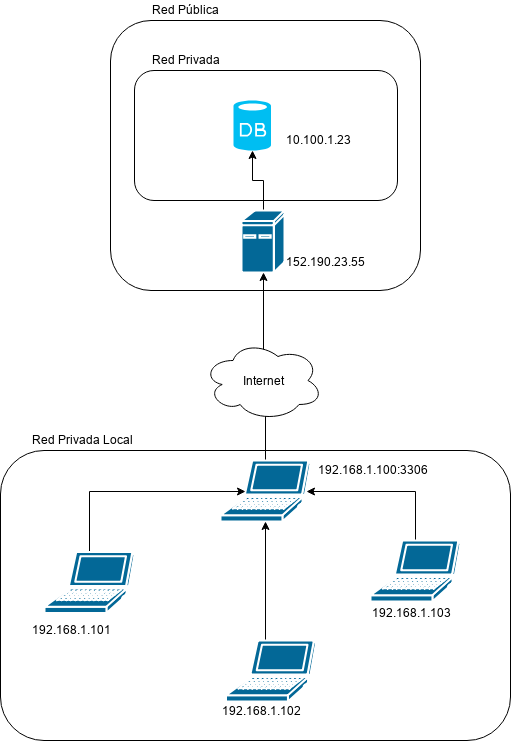
In order to get this scenario working we only need at add an extra option to the execution:
ssh -nNT -L local_ip:portA:private_host:portB user@server
Donde
local_ipis our machine’s local network IP address, in case we are in different networks and not sure of the our IP address we set it to0.0.0.0that will expose it in all the networks that are connected to.
ssh -nNT -L 192.168.1.100:3306:10.100.1.23:3306 root@ip_droplet
From the previous run all machines in our local network can connect to 192.168.1.100:3306 and that way they will access the MySQL server which is in a remote private network.
Reproducing the example in our public server
One of the defaults behaviors in MuSQL is that it does not expose the 3306 to any network i.e. it is only available locally. So if we install MySQL in our public server the port 3306 will not be exposed to the Internet and we could consider it to be in a “private network” and apply what we learned so far.
Once in the server we install MySQL by running:
$ sudo apt install mysql-server
We want to make sure that MySQL is not exposing the 3306 port to the Internet.
For that purpose we have two options:
Use netstat internally
We will check that there is an open socket in port 3306 but this one is using address 127.0.0.1 i.e. only available to the same machine.
$ netstat -tlpn
The output will be similar to:
Active Internet connections (only servers)
Proto Recv-Q Send-Q Local Address           Foreign Address         State       PID/Program name
tcp        0      0 127.0.0.1:3306          0.0.0.0:*               LISTEN      2722/mysqld
tcp        0      0 0.0.0.0:22              0.0.0.0:*               LISTEN      784/sshd
tcp6       0      0 :::22                   :::*                    LISTEN      784/sshd
And as expected we see that MySQL is exposing the 3306 only for the same machine and not accessible from any network (public or private).
Using nmap externally
In order to check if port 3306 is open to the public we use nmap:
$ nmap -Pn server_ip -p 3306
And the output will be something like:
Starting Nmap 7.40 ( https://nmap.org ) at 2018-08-18 23:24 -04
Nmap scan report for 142.93.204.171
Host is up (0.12s latency).
PORT     STATE  SERVICE
3306/tcp closed mysql
3306/tcp closed mysql says that we cannot access this port from the outside.
Using Local Port Forwarding
Now the question is: How can we access MySQL from outside?. There are different answers to this question but this post will use Local Port Forwarding to map a port from our local machine with a port that can only be accessed internally from the public server.
ssh -nNT -L 3306:localhost:3306 root@server_ip
This way we check in our computer that port 3306 should be open. To verify we run the next in our local machine.
$ netstat -tlpn
With an output similar to:
Proto Recv-Q Send-Q Local Address           Foreign Address         State       PID/Program name
tcp        0      0 127.0.0.1:3306          0.0.0.0:*               LISTEN      23193/ssh
tcp        0      0 0.0.0.0:22              0.0.0.0:*               LISTEN      -
Where 127.0.0.1:3306 says that port 3306 is only available for our local machine using a secure channel to the remote’s server internal MySQL server.
In addition we can make other machines in our local network to access our machine which in turn can access remote’s internal MySQL server. We do that by running:
$ ssh -nNT -L 192.168.1.100:3306:localhost:3306 root@server_ip
To verify that it is available in our internal network we run:
Proto Recv-Q Send-Q Local Address           Foreign Address         State       PID/Program name
tcp        0      0 192.1681.1.100:3306     0.0.0.0:*               LISTEN      23193/ssh
tcp        0      0 0.0.0.0:22              0.0.0.0:*               LISTEN      -
Final Comments
In this first part we checked how to expose from our local computer a service that can be only accessed privately from a public server using Local Port Forwarding.
Personally I use this technique a lot in order to access database servers or any other private service inside a private cloud in case there is no VPN, this makes my work simpler and prevents us from exposing private services to the public.
In the next part of this posts, I will show how to expose services from our local machine or local network to the Internet by using a public server.